You all know my love for all greek food! (Check out my greek salad recipe here!) I was so excited to try this recipe for Greek Salad Skewers, another one that is part of my summer entertaining series on YouTube. This is another great recipe for summer gatherings. It is a quick and easy recipe to put together when you go to someone’s house or need to put something together quick! I also love the way it looks on a platter- so fresh and bright! So here is the full recipe for how to make greek salad skewers.

Here is What you Need for Greek Salad Skewers

This will make 12 skewers

1 large block of feta (about 12-oz.), which you will cube

1/4 cup of extra-virgin olive oil

1 tbsp. of lemon juice

1 clove garlic, smashed

1 tbsp. of chopped fresh dill

1 tbsp. of chopped fresh parsley

Flaky sea salt

Freshly ground black pepper

12 pitted kalamata olives

12 cherry tomatoes

1 cucumber, cut into 12 large cubes

The How To’s

  1. First, you will marinate feta. This will make it so flavorful and really adds a little punch to the whole taste of the skewers! Take a bowl, and combine the feta (cut into 12 cubes), olive oil, lemon juice, garlic, dill, parsley, salt and pepper.
  2. Next, you will toss it all together until the cheese is fully coated in the mixture and saturated.
  3. Let the mixture sit for 15 minutes. This way the cheese will really soak up the mixture!
  4. Take your wooden skewer and add on cube of feta, one olive, one cherry tomatoes and one cucumber. You can repeat if there is still room on the skewer.

And that is it! So easy, fresh, and delicious! I hope you enjoy this recipe!
This is another recipe in my summer entertaining series. I think the summer is a perfect time to test out new recipes, as we are entertaining more and visiting friends (safely). I have always wanted to make hummus from scratch but just haven’t taken the time to do it until now! It is actually a little easier than I expected. I love how this recipe (found here) had lots of greek toppings on the hummus too- which makes it even better! So check out how to make this loaded hummus recipe below!

Here is What you Need for Loaded Hummus

1 can of chickpeas, drained and rinsed (16 oz can)

1/3 cup of tahini

1/2 cup of crumbled feta cheese, (you will use half in the hummus and half for the topping so 1/4 each)

3 tbsp extra-virgin olive oil

3 tbsp fresh lemon juice, plus more for serving

2 tbsp fresh dill sprigs

1 clove garlic

Kosher salt

Freshly ground black pepper

1/2 cup diced English cucumber

1/2 cup diced cherry tomatoes

1/4 cup pitted and chopped kalamata olives

Pita chips or pita bread of your choice to dip in

You can also use veggies to dip in it too

The How To’s

  1. First, you will take a food processor- I like this one from Amazon! In the food processor, combine chickpeas with tahini, ¼ cup of the feta, olive oil, lemon juice, dill, garlic, and 3 tablespoons water. The water just helps to thin it out a little. You will process it until it is nice and smooth. I tried my hummus a couple times, and added in a little more lemon juice, olive oil and garlic to taste! When you’re done you can add a little bit of salt and pepper on top.
  2. Put the mixture in a shallow bowl.
  3. Then you will top the hummus with cucumbers, tomatoes, olives, and the remaining ¼ cup of feta. Season with salt and pepper, drizzle olive oil and add a little more lemon juice if you’d like!
  4. Serve the hummus with pita bread or pita chips.

Enjoy this recipe!

This recipe for Spinach Artichoke Zucchini Bites is so good and part of our summer entertaining series! It is also relatively easy to make. This would be a perfect dish to prepare for a party on your patio and also the perfect appetizer to bring over to a party you are attending. I also loved using these cute plates for serving this appetizer! It also comes with a matching tray! It is also relatively healthy as you use a piece of zucchini instead of a cracker. We got this recipe from Delish!

Here is What you Need for Spinach Artichoke Zucchini Bites

4 oz. cream cheese, softened

2/3 cup of shredded mozzarella

1/4 cup of freshly grated Parmesan

1/2 cup of canned artichoke hearts, drained and chopped

1/2 cup of frozen spinach, thawed and drained

2 tbsp. of sour cream 

2 cloves of garlic, minced

Pinch crushed red pepper flakes 

Kosher salt 

Freshly ground black pepper

3 zucchini, cut into 1/2″ rounds (this will be used instead of a cracker)

The How To’s

  1. Preheat the oven to 400°
  2. Line a large baking sheet with parchment paper to keep them from sticking to the baking sheet
  3. Combine the cream cheese, mozzarella, artichokes, spinach, parmesan, sour cream, garlic, and crushed red pepper. Additionally, you can season with salt and pepper to taste. 
  4. Then you will take a spoon and dollop a small portion of the mixture on top of each zucchini coin. If you do an amount slightly smaller than the surface of the zucchini, it will not overflow over the edges while cooking.
  5. Bake them for 15 minutes or until zucchini is softened and the cheese melts.
  6. For more color, broil on high for a few minutes watching carefully.

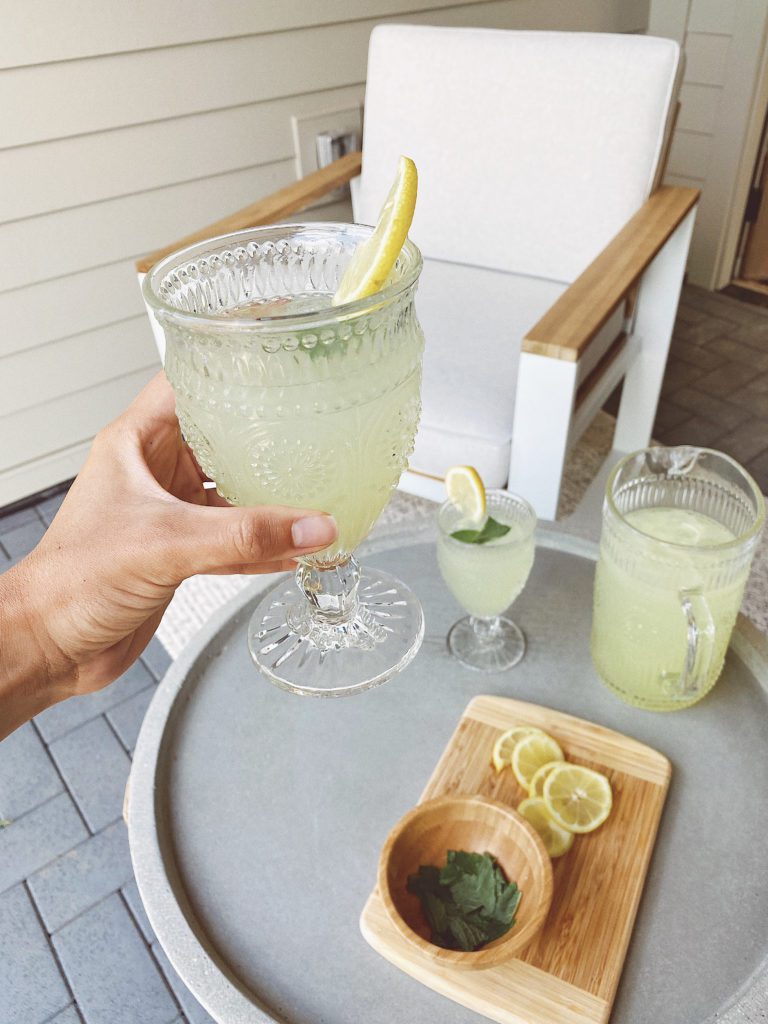
We thought it would be so fun to highlight some cocktail recipes throughout this summer. The first one we are trying is the Limoncello Collins! This version of a Collins is so refreshing and good. It reminds me of when we were in Italy and they serve you limoncello after dinner every night-so fun! We made them in these adorable glasses and pitcher that I found at Walmart- and they are great quality! Here is what you will need to make it!

What You Need for a Limoncello Collins

Makes 8 drinks

16 ounces limoncello (lemon-flavored liqueur)

12 ounces gin

8 ounces fresh lemon juice

24 paper–thin lemon slices

Ice

16 ounces chilled club soda

8 mint sprigs

The How To’s

First, you will need to squeeze all your lemons! This takes a little bit of time but is so good to have it fresh!

Then, you will take a pitcher and combine your limoncello, lemon juice, and the gin!

Next, cover your pitcher and place it in the refrigerator. It will need to chill for two hours to get nice and cold!

Now, take your glasses and press three thinly sliced lemons along the bottom of the glasses. Then, you will add ice to the glasses.

Next, take your mixture out of the refrigerator and pour it into each glass over the ice.

Lastly, you will stir in 2 ounces of club soda into each drink and garnish with a mint sprig.

Enjoy! We got this recipe from foodandwine.com

These cookies are so good- and actually really healthy too! They are dairy free and gluten free. This recipe is definitely going to be on repeat this summer. Here is how you make this amazing healthy chocolate chip cookie recipe!

What You Need for the Healthy Chocolate Chip Cookie Recipe

1/2 cup gluten free flour

1/4 cup coconut sugar

1 tsp baking soda

1 tsp vanilla

1/4 cup peanut butter

1/4 cup applesauce

1/2 to 1 ripe banana

Pinch of salt

Dairy Free dark chocolate chips for topping

The How To’s

Take a bowl, and mix everything together, stirring evenly.  Form the dough into small balls of dough and place them on a baking sheet evenly spaced. You could also cook them in a mini muffin pan. Sprinkle the chocolate chips on top of the dough. 

Bake 350 for 10-12 mins

When you remove from the oven, add flakey sea salt on top! 

I hope you enjoy this cookie recipe as much as we do! If you like healthy recipes make sure to check out this post on how to make celery juice!

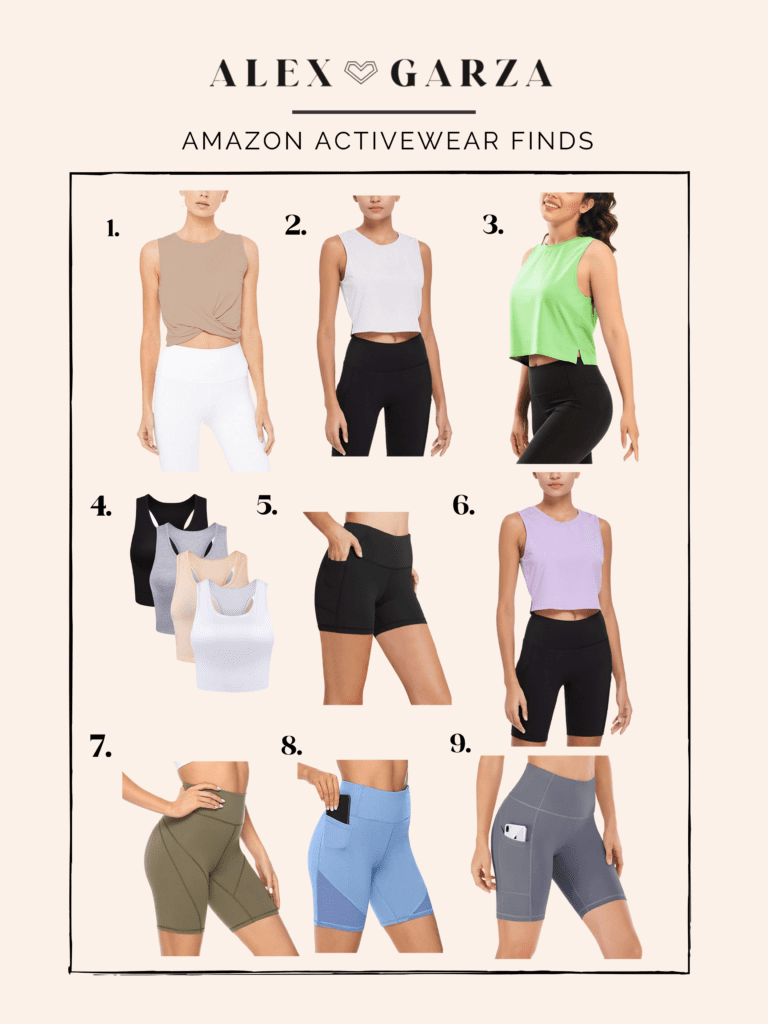
There are so many good amazon activewear finds! The pieces are great quality and amazing prices. I think you can find a lot of styles that you can find at other stores but for a fraction of the cost. Here are some of my favorite pieces I have been shopping lately.

1. | 2. | 3. | 4.| 5.| 6.| 7.| 8.| 9.|

The Breakdown of My Top Amazon Activewear Finds

  1. A neutral top is always so cute! I love the neutral color and the twist detail. It ends up being the perfect length – perfect with high waisted leggings or biker shorts.
  2. The perfect white tank is a great basic. I love having a few good white tanks in my activewear wardrobe. This length is also great and hits at a good spot without being too cropped!
  3. I love the bright green on this tank! It is so fun for summer. The little slits on the side are a cute detail too!
  4. This pack of tanks is so nice! I love that it comes with all four colors. These are kind of a mix between a crop top and a sports bra.
  5. These shorts are really nice material and are a mix between a “short short” and biker short. They come in a few colors too!
  6. This purple tank is such a pretty color. I am loving lilac this spring and summer! This is the same tank as the white one above (#2)! I love when you can get a few colors of one tank if you really like it!
  7. Ok, these green shorts are such a nice color- the fit is a little oversized though. They would be good for lounging at home or to sleep in.
  8. Blue shorts are so cute for summer! This color is so pretty and I love the mesh detail and pockets!
  9. I like these grey shorts – they are really flattering as well. They also have pockets and would look so cute with the tanks above!

Doing full makeup is so fun but let’s be honest, we don’t always have the time to go full glam. A lot of times I usually only have a few minutes to get ready in the morning. So, I put together a few tips on getting ready fast- even in five minutes! These are easy things that you can do to make yourself feel more put together. I also did an IGTV tutorial if you want to watch, which is linked below!

Tip One

First tip, is to put these Tan Luxe face drops in your moisturizer at night. By mixing them together and applying it to your face before bed you will wake up with a nice subtle glow. Having a natural tan always makes me feel better and more put together. I have been using these face drops for a while and they are definitely my favorite. (I also love Tan Luxe The Gradual for all over tanning lotion). These are definitely my two go-to products for self-tanning.

Tip Two

Second tip, is to put your hair in a low bun or ponytail parted down the middle. I think this looks so chic and it takes seconds to do! It is one of my favorite tips on getting ready fast!

Tip Three

The third tip, is to put on some hoops! My favorites, as you know are from Miranda Frye and these larger hoops are so glam! They are also super lightweight. I think gold jewelry can really instantly dress up any look- even athleisure wear! You can check out my whole blog post on Miranda Frye Here!

Tip Four

Next, I will add a little concealer! Concealer instantly makes my eyes look brighter! My favorite one is from Fenty Beauty! I love the formula and it gives a nice full coverage without being too thick. When I am only wearing concealer and not foundation, I will keep the concealer as close to my skin tone as possible-that way it blends really well!

Tip Five

Next step, I will take my Benefit Brow Pencil and lightly fill in my brows. Nothing too dramatic here, but just anywhere that is a little sparse. I finish it off with the Benefit Brow Gel-a product I have been using for years.

Tip Six

For cheeks, I use the Milk lip and cheek tint. This is a great all-around product and so easy to apply with your finger! Just gives your cheeks and lips a little color!

Tip Seven

For the lashes, when I don’t have extensions, I just curl them and then apply a quick coat of mascara! But, when I have extensions, it really takes time out of my makeup routine, which is amazing!

Bonus Tip

If you have a little extra time, feel free to add a little bronzer. I love this Charlotte Tilbury palette– the shades are amazing and it includes everything you’d need in one palette for bronzer, blush and contour!

That is it for my tips on getting ready fast! I hope these little tips will help you get ready quick and leave you feeling a little more glam then before!

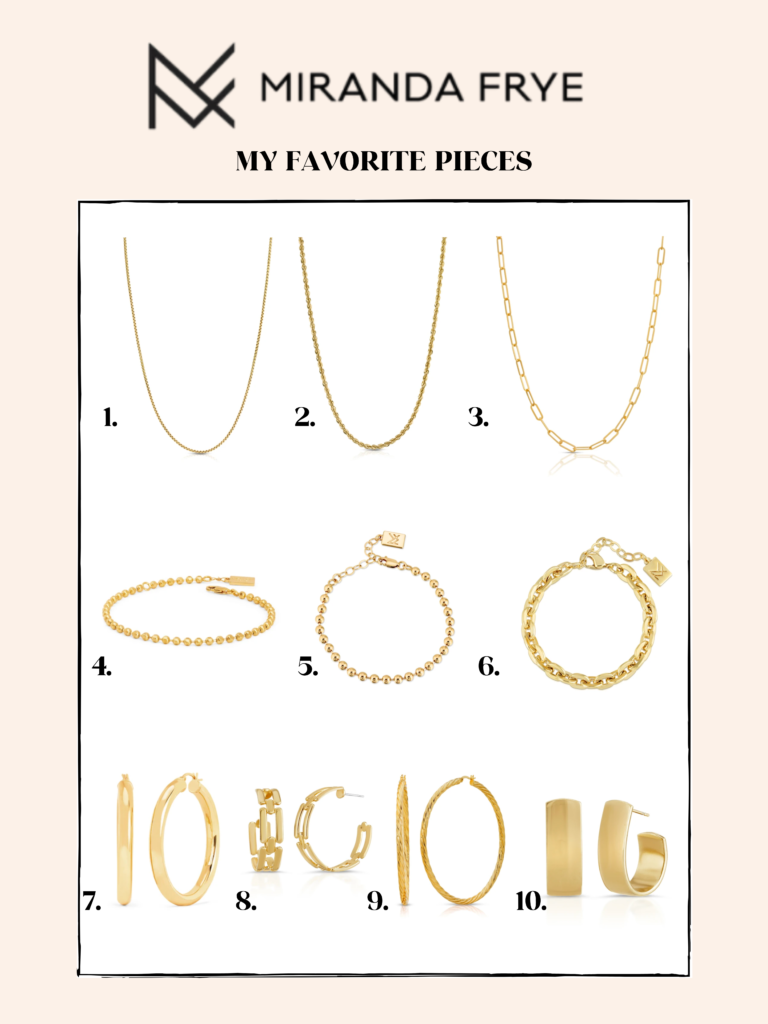
As you all probably know, Miranda Frye is where I get all of my everyday jewelry. Miranda Frye jewelry is amazing quality, doesn’t tarnish, and is at a great price point. These pieces can instantly make any outfit chic. Here are some of my favorite pieces. You can shop them all here on their website! You can also use code ALEX for a discount. I hope you love these pieces as much as I do!

1. | 2. | 3. | 4. | 5. | 6. | 7.| 8.| 9. | 10.|

I have been diligent about a nighttime and morning skincare routine for a while now. I think it is really important to stay consistent with morning and night skin care. It really helps with acne and anti-aging and just keeping your skin in good overall condition. It also helps me to feel refreshed and awake in the morning! I also love this waffle robe! I put it on first thing in the morning while I do my morning routine! Here is everything I do in my summer morning skincare routine

Step One

I start off using the IS Clinical cleansing complex. It is a really great basic cleanser. I will cleanse my face and then pat it dry with a towel. This is an important step in your morning skincare routine. Cleansing in the morning is just as important as at night.

Step Two

If I am having any breakouts (especially from wearing a mask in public now), I will use this Differin Acne gel on any spots that I have. It works really well too help my acne heal and prevent it from becoming a problem.

Step Three

I apply my serums! I like to do something really hydrating in the morning, so first up I always do a vitamin C serum. My favorite is the SkinCeuticals CE E Ferulic. You know I’ve  been using this for years and this is probably my 20th bottle (for real). It’s just an amazing vitamin C serum to keep your skin looking bright and even help a little bit with dark spots etc.

I then apply my Glowbiotics Acne Serum all over my face. Next up, is the TNS Essential Serum, another favorite of mine for anti-aging. All of these serums I have used for a while, I just mix up which ones I use sometimes.

Step Four

I apply my moisturizer. This one I am using right now is by Epionce. It is really nice and lightweight. I change up my moisturizer a lot as there are so many amazing products out there!

Step Five

Lastly, I apply a tinted moisturizer or SPF. My go-to is usually the IT Cosmetics CC cream for a more full coverage but still is lightweight. I use it in shade medium tan. Stay tuned for updates to my skincare routine! You can also check out my full self care routine over on this post!

This morning fruit smoothie recipe has become a part of my routine over the years, and now I ALWAYS start my day with a smoothie for breakfast. Sometimes I will have something like toast or hash browns on the side if I am still a little hungry. But, it is a great way to get in a lot of your fruits and vegetables before the day begins and all in one meal! These are also good for when you are on the go- it makes it easy to drink it as you go on with your day!

For my smoothie, I use the Vitamix Blender. This is a great investment if you are someone who makes smoothies a lot! I can make enough for my whole family at once using this. This is definitely one of my kitchen essentials- you can check out my post of all my kitchen essentials here!

How I Make My Morning Fruit Smoothie

Step One

I will add a little bit of coconut water and then the rest just regular water. This makes it less creamy than if you add milk.

Step Two

I will add some frozen blueberries and a frozen packet of dragon fruit from Pitaya Plant Power. Then I will add in some pineapple and lastly, I will add in a banana usually. Smoothies are fun because you can really mix up what fruit you are putting into it and can come up with some great combinations!

Step Three

You will add in your greens! I usually use kale. I will add in a handful or two of frozen kale. Then, I put in a spoonful of the Amazing Grass Superfood powder and a little bit of Spirulina. I top it off with a little bit of ginger and lemon.

Step Four

I will put it in these plastic cups I got from Amazon and use my favorite glass straws. I hope you enjoy this summer fruit smoothie recipe as much as I do!