Are you craving something sweet yet want to raise your protein intake? Imagine sipping on a luscious smoothie that tastes like dessert but is chock-full of protein and good-for-you ingredients. If the idea of a chocolate-covered cherry or chocolate-covered strawberry in the form of a smoothie piques your interest, then I’ve got the recipe you’ve been waiting for. It’s a perfect post workout shake for Valentine’s Day! This smoothie brims with rich chocolate flavors and the natural sweetness of cherries, all blended into a high-protein potion that’s perfect for a post-workout boost or a delightful morning kickstart.

Let’s dive straight into the steps so you can whip up this tasty treat in no time.

Ingredients for Your Chocolate Cherry Strawberry Smoothie

Before we get started, make sure you have these ingredients on hand:

  • 1/2 cup of frozen cherries
  • 1/2 cup of frozen strawberries
  • 1 serving of chocolate protein powder code ALEX20
  • 1 tablespoon of cocoa powder
  • 1 serving of PB2 or nut butter of choice
  • 1 cup of unsweetened almond milk
  • Optional 1/2 or full frozen banana
  • Cacao Nibs for topping

Crafting Your Protein-Rich Creation

Step 1: Cherry Preparation

The key to a creamy smoothie is using frozen fruit. It eliminates the need for added ice and gives the smoothie a thick texture. Tip: freeze your fresh fruit before it goes bad so you always have it on hand!

Step 2: Add it all together

Pour in 8oz of almond milk into your blender. Add in frozen fruit, nut butter and protein powder.

Step 3: Blending Brilliance

Blend the mixture on high speed until everything is thoroughly combined and the texture is silky smooth. Check the consistency and add more almond milk or ice to reach your preferred thickness.

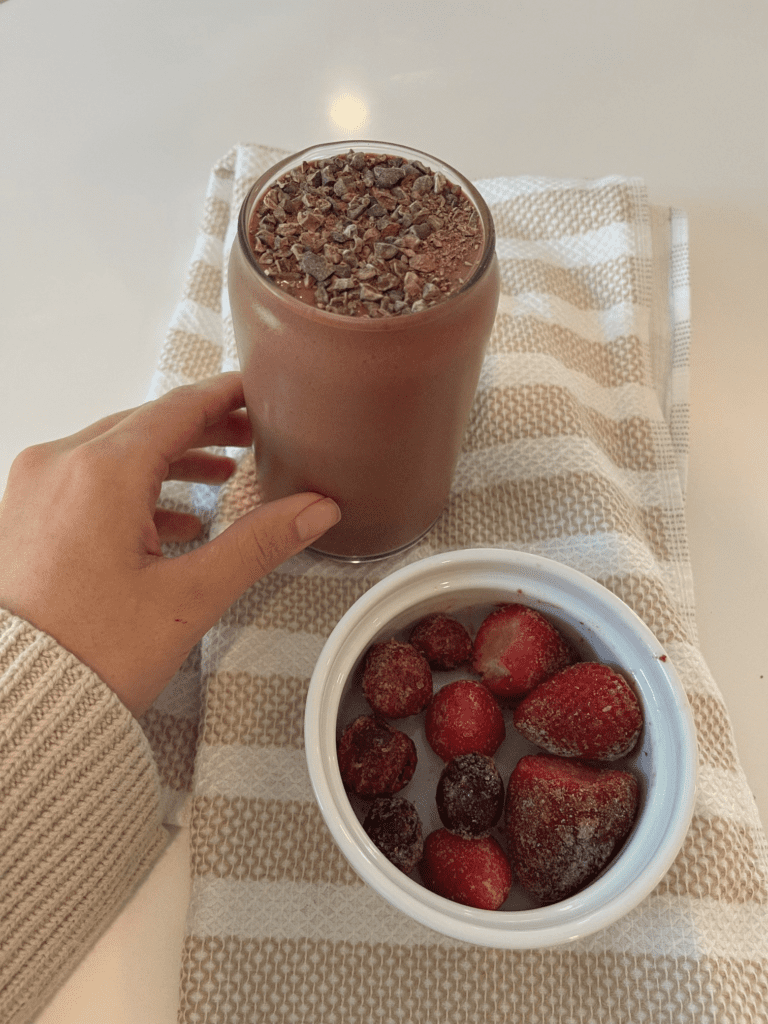
And top with cacao nibs for that chocolate crunch!

The Health Benefits You Can’t Resist

This chocolate cherry protein smoothie isn’t just a flavor-bomb; it’s also loaded with health benefits. Cherries are packed with antioxidants and anti-inflammatory compounds. They’re also known to promote better sleep, which makes this smoothie a perfect choice for an evening snack. I’m currently trying to add in a few cherries or tart cherry juice daily to help with my acne prone skin.

The protein powder provides a hefty dose of muscle-bolstering nutrients, essential for post-exercise recovery. Cocoa powder, in addition to adding that rich chocolate taste, contains flavonoids linked to heart health.

Unsweetened almond milk keeps the calories low, and peanut butter contributes to your protein and fat intake.

Sip and Savor

The satisfaction of sipping on a dessert-like smoothie that’s actually wholesome and protein-packed is hard to beat. Give your taste buds something to dance about and your body something to thank you for.

It’s time for you to blend your own chocolate covered cherry strawberry protein smoothie. Enjoy the process and most importantly, enjoy the sumptuous results.

Give it a try and let your senses be delighted by this sweet yet healthy concoction. You may just find that it’s your new favorite way to indulge without a smidgeon of guilt. Cheers to your health and happiness!

Products Used:

Beast Blender: I’ve had this blender for over 2 years now and it’s still going strong. I love it because it’s super high power but small and sleek on my countertop. You can get different sized cups depending on the size of your smoothie. I actually bought one for my sister for Christmas and she has been so impressed!

Vegan Protein: I am not vegan but dairy- free protein digests better and agrees better with my stomach. I love this Chocolate Maca one because Maca is also great at balancing hormones. Most dairy free protein powders taste chalky and thick but not this one. It is my absolute favorite! I found it bc my favorite smoothie shop in town uses this exact one. Now I have smoothie shop level quality at home for a fraction of the price. Check it out here: https://go.sproutliving.com/alexandreagarza2 use my code ALEX20

Cacao Powder: Organic Cacao Powder gives your baked goods and smoothie that decadant rich taste!

Cacao Nibs: They taste like a bitter crunchy chocolate chip in the best way. It really balances out the sweet creamy taste of the shake.

One of the most common questions I have gotten since having Rocco, is “What pump are you using?” I have been using the Spectra S1 pump and really like it so far! I have really enjoyed pumping since it gives me peace of mind knowing how much Rocco is eating. It has been working really well for us thus far. I really like the Spectra pump and love using it with the pumping bras. Those have really been essential because I can use the pump hands free. Another item I have loved using is the Lansinoh ice packs that really help when your milk is coming in. That can be a really painful process so putting these ice packs in your bra really help with the pain during that process. I also ordered a bunch of extra pump parts to make it so I always have one handy. This has helped a lot too. Then, we will use this container for the dishwasher to store all the pump parts which makes the cleaning process so much easier. Additionally, I have been then using the Medela bags to store the milk. Then we put the milk in this plastic tray in our freezer. That system has worked really well for us with Rocco.

As many of you may know, I make celery juice daily! It is a part of my morning routine and I love how many nutrients I can get from it. So, after getting some farm fresh beets from my friend Mallory, I decided to make beet juice! This is also a way to mix up the vegetables I am eating on a daily basis. So here is my current beet juice recipe:

What you need to make beet juice

  • 2 Full peeled and chopped beets
  • 1 cucumber peeled and chopped
  • 1 lemon
  • 1 thumb of ginger
  • Juicer
  • Glass jar or cup
  • Glass straws (I just love using these)

The How To’s

This part is pretty easy!

  • First, I peel and chop up my beets into small square pieces. This makes it easier for them to go through the juicer.
  • Then, I peel and chop up my cucumber and lemons (remove the rind).
  • Then, I funnel the beets, cucumbers, lemons, and ginger through my juicer!
  • I pour it into my favorite glass jars, stir, and then enjoy!

Who doesn’t love a pina colada? They instantly make me feel like I am on a tropical vacation somewhere (which sounds so nice right now, doesn’t it?) As a part of my summer entertaining series, I am making up cocktails that are perfect for a backyard soiree. If you missed it-check out our Limoncello Collins recipe here! These will keep you nice and cool too in this summer heat!

What You Need for a Skinny Pina Colada

Makes 1 drink (but you can double it or triple it)

  •  1 1/2 oz Malibu rum (or to taste)
  • 1/2 a banana
  •  1/4 cup coconut water
  •  1/2 cup frozen pineapple
  •  1 cup ice

The How To’s (It’s Pretty Simple)

  1. First, combine all ingredients into a blender. We use the Vitamix and love it!
  2. Blend until completely smooth!
  3. Serve in a tall glass with a straw and garnish with your choice of fruit!

We got this recipe from here but again kind of approximated some of these amounts! Enjoy!

This is another recipe in my summer entertaining series. I think the summer is a perfect time to test out new recipes, as we are entertaining more and visiting friends (safely). I have always wanted to make hummus from scratch but just haven’t taken the time to do it until now! It is actually a little easier than I expected. I love how this recipe (found here) had lots of greek toppings on the hummus too- which makes it even better! So check out how to make this loaded hummus recipe below!

Here is What you Need for Loaded Hummus

1 can of chickpeas, drained and rinsed (16 oz can)

1/3 cup of tahini

1/2 cup of crumbled feta cheese, (you will use half in the hummus and half for the topping so 1/4 each)

3 tbsp extra-virgin olive oil

3 tbsp fresh lemon juice, plus more for serving

2 tbsp fresh dill sprigs

1 clove garlic

Kosher salt

Freshly ground black pepper

1/2 cup diced English cucumber

1/2 cup diced cherry tomatoes

1/4 cup pitted and chopped kalamata olives

Pita chips or pita bread of your choice to dip in

You can also use veggies to dip in it too

The How To’s

  1. First, you will take a food processor- I like this one from Amazon! In the food processor, combine chickpeas with tahini, ¼ cup of the feta, olive oil, lemon juice, dill, garlic, and 3 tablespoons water. The water just helps to thin it out a little. You will process it until it is nice and smooth. I tried my hummus a couple times, and added in a little more lemon juice, olive oil and garlic to taste! When you’re done you can add a little bit of salt and pepper on top.
  2. Put the mixture in a shallow bowl.
  3. Then you will top the hummus with cucumbers, tomatoes, olives, and the remaining ¼ cup of feta. Season with salt and pepper, drizzle olive oil and add a little more lemon juice if you’d like!
  4. Serve the hummus with pita bread or pita chips.

Enjoy this recipe!

These cookies are so good- and actually really healthy too! They are dairy free and gluten free. This recipe is definitely going to be on repeat this summer. Here is how you make this amazing healthy chocolate chip cookie recipe!

What You Need for the Healthy Chocolate Chip Cookie Recipe

1/2 cup gluten free flour

1/4 cup coconut sugar

1 tsp baking soda

1 tsp vanilla

1/4 cup peanut butter

1/4 cup applesauce

1/2 to 1 ripe banana

Pinch of salt

Dairy Free dark chocolate chips for topping

The How To’s

Take a bowl, and mix everything together, stirring evenly.  Form the dough into small balls of dough and place them on a baking sheet evenly spaced. You could also cook them in a mini muffin pan. Sprinkle the chocolate chips on top of the dough. 

Bake 350 for 10-12 mins

When you remove from the oven, add flakey sea salt on top! 

I hope you enjoy this cookie recipe as much as we do! If you like healthy recipes make sure to check out this post on how to make celery juice!

I have been diligent about a nighttime and morning skincare routine for a while now. I think it is really important to stay consistent with morning and night skin care. It really helps with acne and anti-aging and just keeping your skin in good overall condition. It also helps me to feel refreshed and awake in the morning! I also love this waffle robe! I put it on first thing in the morning while I do my morning routine! Here is everything I do in my summer morning skincare routine

Step One

I start off using the IS Clinical cleansing complex. It is a really great basic cleanser. I will cleanse my face and then pat it dry with a towel. This is an important step in your morning skincare routine. Cleansing in the morning is just as important as at night.

Step Two

If I am having any breakouts (especially from wearing a mask in public now), I will use this Differin Acne gel on any spots that I have. It works really well too help my acne heal and prevent it from becoming a problem.

Step Three

I apply my serums! I like to do something really hydrating in the morning, so first up I always do a vitamin C serum. My favorite is the SkinCeuticals CE E Ferulic. You know I’ve  been using this for years and this is probably my 20th bottle (for real). It’s just an amazing vitamin C serum to keep your skin looking bright and even help a little bit with dark spots etc.

I then apply my Glowbiotics Acne Serum all over my face. Next up, is the TNS Essential Serum, another favorite of mine for anti-aging. All of these serums I have used for a while, I just mix up which ones I use sometimes.

Step Four

I apply my moisturizer. This one I am using right now is by Epionce. It is really nice and lightweight. I change up my moisturizer a lot as there are so many amazing products out there!

Step Five

Lastly, I apply a tinted moisturizer or SPF. My go-to is usually the IT Cosmetics CC cream for a more full coverage but still is lightweight. I use it in shade medium tan. Stay tuned for updates to my skincare routine! You can also check out my full self care routine over on this post!

This morning fruit smoothie recipe has become a part of my routine over the years, and now I ALWAYS start my day with a smoothie for breakfast. Sometimes I will have something like toast or hash browns on the side if I am still a little hungry. But, it is a great way to get in a lot of your fruits and vegetables before the day begins and all in one meal! These are also good for when you are on the go- it makes it easy to drink it as you go on with your day!

For my smoothie, I use the Vitamix Blender. This is a great investment if you are someone who makes smoothies a lot! I can make enough for my whole family at once using this. This is definitely one of my kitchen essentials- you can check out my post of all my kitchen essentials here!

How I Make My Morning Fruit Smoothie

Step One

I will add a little bit of coconut water and then the rest just regular water. This makes it less creamy than if you add milk.

Step Two

I will add some frozen blueberries and a frozen packet of dragon fruit from Pitaya Plant Power. Then I will add in some pineapple and lastly, I will add in a banana usually. Smoothies are fun because you can really mix up what fruit you are putting into it and can come up with some great combinations!

Step Three

You will add in your greens! I usually use kale. I will add in a handful or two of frozen kale. Then, I put in a spoonful of the Amazing Grass Superfood powder and a little bit of Spirulina. I top it off with a little bit of ginger and lemon.

Step Four

I will put it in these plastic cups I got from Amazon and use my favorite glass straws. I hope you enjoy this summer fruit smoothie recipe as much as I do!

I love to start off my morning with a workout! Even if it isn’t super long it is a good way to start off my day with some endorphins and feel accomplished right away! There have been some great workouts on Instagram lately and so I have been picking some of those to do for my summer morning workout routine.

Can we all agree that wearing a cute workout outfit really helps motivate you to workout? The sports bra and shorts I am wearing is super comfortable and I am loving biker shorts right now! A couple other sets I like are linked here: Top Bottoms | Top Bottom | Top Bottom. My tee is one of our archived designs from my store shopgoodtobe.com. Check it out for lots of cute loungewear! My white and neon sneakers are my favorites right now, APL has great tennis shoes!

In terms of the workouts I do, I like to do the Melissa Wood Health videos. A lot of them use minimal weights or no weights which is really nice to be able to do it from anywhere you are! I just lay out my yoga mat and it works perfectly to have a little cushion on the wood floor! There are also a lot of videos that are shorter (around 20-30 minutes) which are perfect for a summer  morning workout routine (especially when you have a toddler)! You can check out all my at home workout essentials in this post here!

As many of you may know, I make this celery juice recipe every morning. It is my favorite way to start off the morning. Celery juice also has so many health benefits too. It helps promote your digestion, boosts your immune system, promotes weight loss, and maintains good sugar and cholesterol levels. I read the book Celery Juice by Medical Medium and use this for a guide.  

Here is how I make my morning celery juice recipe

First, I cut the top and bottom off of a full “bunch” of celery. That way the hard ends are not in the juice. Then I will put the entire bunch of celery in the juicer.  I love this juicer from Williams Sonoma, but another great one is from Amazon. I will then juice it until it is smooth. The last step would be to sift out the imperfections. This strainer is really great and perfect for smoothing out the juice! This will make about 16oz. of juice. If I make it ahead of time for the week, I put them in these cute glass containers. They are perfect for storing them in the refrigerator. I also use these glass straws all the time.

I will drink the whole glass first thing in the morning, and then wait 15 minutes before drinking or eating anything else. Check out our TikTok of how we make it below!

Enjoy!